Wednesday, May 22, 2013

New Outside Play Area

New Outside Play Area

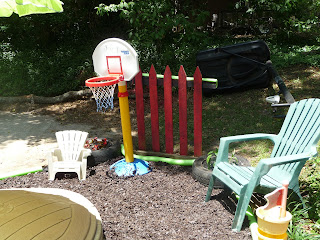
 My mother in law bought us this sandbox at a yard sale a long time ago and it has been sitting on our back porch until we found a snake around it....so it had to move. So I wanted to create a space for it on the side of our house.  I first put down trash bags opened up and taped together to prevent weeds from growing up through the rubber mulch. I poked holes in them to allow water to go through the bags and not collect and breed mosquitoes.

My parents gave me our old family basketball hoop that we hope to put up at the end of the driveway which will help make this whole area complete!


 I found this small chair on the side of the road a long time ago and cleaned it up and it is the perfect size for my son. The little tikes basketball hoop was something I bought when I was in high school and this is the perfect place for it.
The wooden posts along the edge of the play area were found on the side of the road with the piece of fence that I spray painted. I bought swim noodles at Walmart to put around the border to add a pop of color and hopefully prevent accidents on the corner of the pieces of wood.
 My husbands car was totalled and he took the tires off of them because they were nice tires. We were going to sell them, but three years later they were still in the garage. So I received the go ahead to use them for planters!
 I found this ship water table on the side of the road. I wiped it down and cleaned up a couple broken bits and now it is perfect in our little play area.
 I found a pile of fence pieces on the side of the road. I am going to attach metal pots and such to the fence to create a music station. The green chair was given to us from my parents.
 I still have some area I need to fill in with more rubber mulch..but I have to save up to buy it. The green umbrella was given to us by my husbands aunt and uncle for a garage sale we were going to have, but I'm so thankful we saved it because it works great out here!

Rubber mulch: 5.99 a bag at WalMart

Sunday, May 12, 2013

Mothers Day crafts

These crafts could be done anytime not just for Mothers Day, but we made them for Mothers Day. We had a great time making these crafts and hope it has inspired you to make something great with your kiddos!


RECYCLED JEWLERY BOXES

1. Take an old box of some sort such as the smart ones box you see below or a milk carton will work as well you cut it almost in half but leave one side long enough to fold over to cover the top of the box. This will work as a lid.
2. Make papier mache paste. This can be made with either elmers glue and water or flour and water. 
3. Rip up some newspaper into strips...big and small will work for big surfaces and for corners.
4. Dip the newspaper strips into the paste and then apply to the box. You don't want it to be too wet or the box will not hold together. But just wet enough to cover the entire box.
5. Cover with one or two layers of newspaper. I then covered mine with tissue paper so that if any of the area didn't get painted by the kids then it wouldn't be newspaper showing through.
6. Then add decorations and paint. I added a button with string onto mine to latch the box closed. The milk cartons kept wanting to stay open.

I made this with some children for a playdate and had the boxes made ahead of time. But if you were making it over a couple days the children could papier mache the boxes themselves.

Papier mache paste: flour and water
Ripped up newspaper


Cardboard Box, cut with one side longer to make a lid.

Papier Mache! With newspaper and tissue paper.

I LOVE YOU MOM BECAUSE....
 1. Take a piece of paper, it can be any color, but blue seems to look nice.
2. Take a plate and put green fingerpaint on it and press childs into the paint until it is covered.
3. I cut a piece of paper into a flower pot shape. A rectangle or square piece of construction paper would work as well.
4. Take pieces of colored construction paper and glue to the ends of the fingerprint or just all over the handprint.
5. I saw online writing on it I love you mom because....
Green handprint
I love you mom flower pot

Construction paper flowers
 
PAINTED FLOWER POT
 1. Take a flower pot and paint it with acrylic paint. There is no need to paint the inside as it will be covered with dirt.
2. Place flowers into the flower pot.
3. I had the kids go outside and dig up dirt to fill in any empty spots. (This was a lot of the kids favorite part!) Every kid loves to play in the dirt.
4. I then sprayed the flower pots with a clear coat to protect the pot.
5. I also took construction paper and made flowers and put pictures of the kids in the center of the flower and hot glued a popsicle stick to the back of the flower.

A Small flower pot
Flowers
Painted flower pot with acrylic paint

Flower with picture in center
Completed flower pots!
HAPPY MOTHERS DAY to me!

Saturday, May 4, 2013

Baby Celebration!


I recently planned a baby celebration for two of my friends. I found a lot of blog posts helpful in planning the party and coming up with ideas. I hope this post helps you come up with some fun ideas for planning a celebration or shower. They both really liked jungle animals and one of my friends has it for a theme in their babies room. I decided to do a safari theme for the party and had a lot of fun finding different ideas to make it fun.

Bought masks from Hobby Lobby for the kids that came.
There was a dessert table (the image to the left) and a dinner table (the image to the right).

I made diaper cakes for each of the ladies. I have made a diaper cake once before and found I did a much better job this time around. I wish I had done it step by step to show how to make one...since I couldn't seem to find a website with a step by step guide on how to make one. But each of the diapers gets wrapped in a cylinder shape and held together with a rubber band. Then I used a bottle as the core and used a bigger rubber band to hold all the diapers around the bottle. I used some streamers I got at the dollar tree and wrapped it around the layers so you can not see the rubber bands. For the top layer I used a small container of baby powder as the base.

I made labels for each food with little drawings I did of animals. We had chicken sliders and cheeseburger sliders. I chopped up some chicken breasts and made a yummy breading and fried them.  I made mini hamburgers and grilled them on the stove top. I used Sister Schubert Roles for the buns, which was great! I used a Pioneer Woman macaroni and cheese recipe. It was pretty good, I doubled the recipe so I probably didn't add enough spice to it and it was a little bland.


I made cake pops with my cake pop maker. It is almost like a waffle iron, but for cake pops. I found this neat idea online to put chocolate chips in the cake before you shut the iron. It turned out really well and added something extra to the cake pops.

I made homemade vanilla cupcakes. I have this great recipe I found online...most cakes from scratch are best with sour cream or some other ingredient to keep the cake from drying out. I made the icing from scratch as well and it was very good.

As a fun activity I bought white onesies, fabric paint, fabric markers and stamps and most people decorated a onesie. We then hung them from a line to dry and it made a cute decoration.


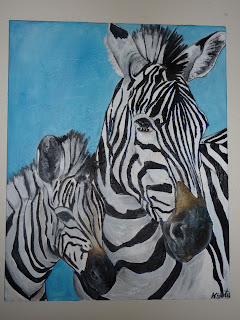
I made each one of the families a painting for their new baby boy's room.  I asked them their preferences, theme and colors of their boys room. This is what I came up with for them.